


How to Cook with Uncoated Stainless Steel Pans

Andrew Bluett-Duncan
Director
Master The Art Of Cooking Without Non-Stick Coatings
Essential Principles
- The Golden Rule: If food sticks, it's burning - and burning makes it stick
- More Layers = More Forgiveness: 3-ply is good, 5-ply excellent, 7-ply fantastic for heat distribution
- Temperature is Key: Medium heat works for most tasks - higher isn't always faster
- The Water Test: Mercury-like water droplets indicate perfect searing temperature
- Uncoated Advantage: You can't damage the pan - only the food, so practice makes perfect
Jump to Section
Why Uncoated Stainless Steel?
Most of us have used non-stick coated pans for years and have little knowledge of cooking in uncoated pans. The truth is, neither our grandparents nor Auguste Escoffier had "non-stick" pans, and they cooked very well indeed.
With uncoated pans, the worst that can happen is you burn the food and ruin it - but you can try again, and crucially, you have NOT damaged your pan. This guide will help you navigate cooking with uncoated stainless steel with confidence.
Understanding Pan Construction
The construction of your pan significantly affects your cooking experience:
3-Ply Construction
Very good heat distribution. Three layers of metal provide reliable performance for most home cooking tasks.
5-Ply Construction
Excellent heat distribution. Five layers offer more forgiveness and better temperature control, ideal for developing your skills.
7-Ply Construction
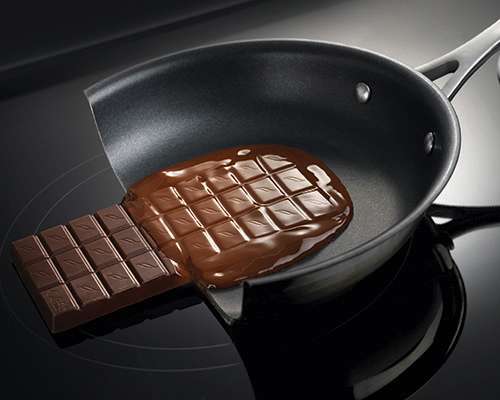
Bloody fantastic (pardon our French). Seven layers provide exceptional heat distribution with maximum room for error. The thick construction allows for techniques like melting chocolate directly on the hob.
The main difference: The thicker a pan is, the more room for error in heat distribution it will allow you. This means you have more control and less chance of hot spots causing burning.
Shop 3-Ply Shop 5-Ply Shop 7-PlyFrying Level 1: Simple Frying with Oil
Perfect for: Sausages, bacon, onions, mushrooms, omelettes
Understanding Oil Behavior
When you put oil in a cold pan, it's rather thick and moves about slowly. As it heats up, it looks "thinner" and moves about faster. This visual cue is your friend.
The Method
- Put your pan on the hob at medium to medium-high temperature
- Add your fat (oil or butter) to the pan
- Watch the oil - when you see it moving quicker, add your food
- The food should gently sizzle - NOT spit and splash about
- Reduce heat if necessary
Temperature Reality Check
The official temperature of frying is 180°C - which is not a lot. Many of us have been led to believe that higher heat creates quicker cooking, but that's not always the case. Patience and proper temperature control yield better results.
 Shop Samuel Groves Pans Shop Supreme Pans
Frying Level 2: Searing Meat & Making Pancakes
The Science of Searing
To get a juicy steak, we need to sear it to create an outer crust that hardens and keeps all the juices inside. This requires a very high initial heat.
The Water Droplet Test
This is your most important technique for perfect searing:
- Put your pan on the hob at maximum strength
- Have a glass of water nearby
- As the pan heats, flick a bit of water into the pan
- Too cool: Water evaporates in a mini cloud of steam
- Perfect: Water turns into little balls that roll about like mercury - they don't evaporate
| Surface Temperature | Droplet Behavior |
|---|---|
| Too Hot | Droplets divide into smaller droplets and move rapidly around the pan |
| Too Cold | Droplets bubble and evaporate rapidly |
| Perfect Temperature | Droplets remain whole and move around like mercury balls - no evaporation |

Searing Your Meat
- Once you achieve the perfect temperature (mercury-ball water), add your steak, chicken breast, or pork chop
- Use a fork to press the meat ensuring it touches the pan evenly
- CRITICAL STEP: Immediately reduce heat by about 1/3 (e.g., from 9 to 5-6 on an induction hob)
- Don't panic! The meat will stick to the pan initially - this is good sticking
- Wait and observe - after a few minutes, the sides of the meat will lift up gently
- Test with a fork or fish slice - if it lifts easily, it's ready to turn
- If it doesn't lift easily, wait longer
- If juices are dark brown, reduce heat further
- When you turn it over, you'll see a lovely golden seared surface
The Good Stick
When meat first hits the pan at proper searing temperature, it will stick completely. This is intentional and correct. The meat will naturally release when it's properly seared. Trying to force it off early will tear the surface and ruin your crust.
Perfect Pancakes (Crêpes)
I always cook crêpes in uncoated pans because the result is nicer.
- Put butter in your pan at medium-high temperature
- Use a brush or kitchen paper to coat the whole surface
- Pour a small quantity of mixture
- WAIT until the sides start to lift off
- Use a fish slice to turn it
- Watch your pan temperature - too hot will burn and stick
The First Pancake Rule
I was always taught that the first pancake tends to go wrong - that's because we need to find the right temperature for our specific pan and hob combination. Don't be discouraged!
Frying Level 3: Eggs, Fish & Breadcrumbs
These are the situations where coated pans prove excellent. Remember that non-stick coatings are NEVER designed for very high heat, but they do have their place.
However, our grandparents and Auguste Escoffier managed without non-stick pans. Here are techniques for mastering these trickier foods - be kind to yourself and allow learning time.
Fried Eggs
Eggs are the natural glue of the food world. You must ensure fat covers the entire cooking surface.
For White, Soft Fried Eggs
Use medium temperature (as in Frying Level 1). Ensure generous fat coverage and gentle heat.
For Crispy, Golden Fried Eggs
You need enough fat in your pan and very hot temperature. Drain finished eggs on kitchen paper to remove excess fat.

Fish
Unless extremely fresh off the boat, fish will easily flake, stick, and break up as you try to unstick it.
Solution: Cook fillets with the skin on.
- Use high temperature with enough oil and a bit of butter
- Cook skin-side down first
- Reduce heat when flipping over
- The skin protects the delicate flesh and provides structure

Food Coated in Breadcrumbs
Breadcrumbs will come off the food and likely burn in an uncoated pan.
Two Options
Without added fat: Use your oven, not your frying pan.
In a frying pan: Use generous oil or butter on medium heat.
Sauciers and Sauté Pans
General Approach
Start on medium/medium-high temperature with oil and/or butter, and observe what's happening in your pan. If food starts to stick, reduce the heat.
Example: Building a Chicken Pie
- Brown a few onions
- Add bacon (if honey-cured, sugar content might cause sticking)
- Sweat some leeks
- Add butter and flour
- This combination often starts sticking - don't panic!
- Reduce heat
- As you add liquid to make the sauce, it naturally deglazes the pan
- Those browned bits become pearls of flavor adding taste to the whole dish
Melting Chocolate Directly on the Hob
With 7-ply Demeyere pans, you can melt chocolate without a bain-marie:
- Use the smallest heat possible
- Check with your hand that you can still touch the pan body
- Remember: chocolate melts in your mouth (body temperature)
- If too hot to touch, it will separate your chocolate
- The thick 7-ply construction allows safe direct melting
Saucepans and Casseroles
Waterless Vegetable Cooking
If you have Demeyere Atlantis saucepans, you can cook with just a few tablespoons of water - thanks to the thick base and well-fitting lids that prevent water loss.
The Method
- Put rinsed vegetables in your saucepan
- Add ½ inch to 1 inch of water
- Place on hob and wait for water to boil
- Put lid on and reduce heat by half
- If you see steam escaping, reduce heat further
Why This Works
The thick base and perfectly fitting lid retain all the water content from the ingredients themselves. Your vegetables will be even more delicious than if you'd steamed them - truly worth trying.
Cleaning & Care
After Medium Heat Cooking
Very easy! Uncoated pans wash well in the dishwasher, or with a sponge or scourer with washing-up liquid.
After High Heat Cooking
Step 1: Deglaze
On medium heat, add liquid (water, white wine, or stock). Use a small spatula to gently help welded bits unstick, creating a jus that can be poured on meat or used as sauce base. The pan looks almost clean before it reaches the washing-up bowl!
Step 2: For Stubborn Oil Deposits
After deglazing, use Demeyere cream cleaner with a strong scourer. The scrubby sponges we stock work wonderfully on stainless steel (and on steel or uncoated cast iron).
Step 3: For Burnt Food
Good old soaking works wonders. One beauty of Demeyere's patented Silvinox stainless steel finish: even when you burn food, the pan comes back as new.
Dealing with Marks After Cleaning
White Marks
Deposits of mineral salts from food (particularly mushrooms or meats). Clean easily with lemon juice or vinegar - just add a little and gently rub with a sponge. No elbow grease needed!
Blue Marks
Natural reaction of well-cooked starchy food on stainless steel. These disappear on contact with lemon juice or vinegar.
⚠️ Important Warning
Never leave a pan unattended on high heat. It's a fire risk, and in extreme cases may distort the base or body.
I've only seen this happen twice in 25 years - both times someone left a pan steaming at high temperature and left the house for 3+ hours. The pan bases significantly bowed.
Why Buy from Art of Living?
We've specialized in premium cookware for over 50 years, with expert knowledge of Demeyere's exceptional range.
Ready to Master Stainless Steel Cooking?
Explore our complete range of uncoated stainless steel cookware


Leave a comment